


Easy Manage System
An App to solve your day by day management task
Easy Manage System
An App to solve your day by day management task


.png)
APP GUIDE MENU
-
Owner Self Registration ........................................................................
-
Download M4U Home System APP ......................................................
-
3 Options to login M4U Home System APP ..........................................
-
3 things need to do ..............................................................................
-
How to do email verification ..................................................................
-
Basic Introduction .................................................................................
-
How to add unit contact number to guard device ..................................
-
How to add owner family members / tenant ..........................................
-
How to add vehicle ................................................................................
-
How to collect parcel .............................................................................
-
How to apply facility booking .................................................................
-
How to apply application .......................................................................
-
How to view unpaid invoice ...................................................................
-
How to view paid invoice & receipt .......................................................
-
How to make payment ..........................................................................
-
How to view SOA (statement of account) .............................................
-
How to add feedback ............................................................................
-
How to do pre-register for visitor (single entry) .....................................
-
How to add favourite list for visitor ........................................................
-
How to find favourite list ........................................................................
-
How to add new event for a group of visitor ..........................................
-
How to share the event registration link ................................................
-
How to add SOS link (alert neighbour) .................................................
-
How to cancel SOS link ........................................................................
-
How neighbour to accept the SOS link request ....................................
-
How to reset password .........................................................................
APP GUIDE

OWNER SELF REGISTRATION
Click the Button below for Owner Self Registration.
(Need to wait for the Management / Committee to approved then only can login into M4U Home APP)


Username : 22Ajdi8o1 (unit no road owner1) or (unit no owner1 for condo)
(Only can use for 1 time, no duplicate same as create email address)
Suggest to put House Number Unit + Jalan Name + o1 (This "o1" is for the first Owner who registered)
22Ajdi8o2 ("o2" is for the second owner or owner family members and carry forward to "o3")
~ If the unit register for tenant, please follow as 22Ajdi8t1 ("t1" is for First Tenant)
Owner or Residents can choose 3 options to Login M4U Home Apps
Username/ Email Address / Mobile Number (Email Address and Mobile Number based on the Information that residents provide in self registration)
Temporary Password : Follow your own mobile number (Follow management provided)
(This is temporary use, will request to change password when first time login)
IMPORTANT NOTE : Once you did the changes of password, you need to log out first. Then login again using the new password that you change recently

Please click the button to download M4U Home System APP.


3 Options to login M4U Home App after approved by management office.

22Ajdi8o1

0123456789

Option 1: Login via
Username
Option 2: Login via
Email Address
Option 3: Login via
Mobile Number
If the owner having more than 1 unit in the same community then can using Option 2 or 3 to login.
3 THINGS NEED TO DO


Set New Password


Go Setting to enable all


Logout from the APP first, Then re-login using new password
HOW TO DO EMAIL VERIFICATION
1. Check Mailbox (Inbox/SPAM Mail) sending from noreply@manage4u.com.my
-
Subject: Email Verification Required
-
Please Click To Verify or copy the link, paste it on a web browser to validate your email address before you can use the account. [There is a link]
2. Just click on Click To Verify. Done the process, if prompt out an Error message, then need to contact Management Office to Resend Re-verify Email.

Notes:
-
All owners must do this email verification.
-
Reset Password is required and implement with payment gateway will be sending a copy of the receipt to their email as well.


BASIC INTRODUCTION
HOW TO ADD UNIT CONTACT NUMBER
TO GUARD DEVICE


Go to Menu

Go to Unit Contact No.

Press + Button


Add family / tenant contact number then press add button


Press OK button to confirm


Here will display the contact,
you can choose who become
the first contact person

Security Guard Device shows
Intercom 1 = Kelly
Intercom 2 = Don
Intercom 3 = Joe
HOW TO ADD OWNER FAMILY MEMBERS / TENANT
Go to Menu
Go to Manage User


Press + Button

Add Family Members details, Choose Account Type and username as 22Ajdi8o2. Username cannot indicate spacing, symbol “,” “&” “()”

You can set permission
-
Allow them to view maintenance bill
-
Set this number to Security Device System then Enable to Green

Temporary password will send
via email, Please check mailbox

HOW TO ADD VEHICLE


Go to Menu


Go to Manage Vehicle


Press + Button


Complete the vehicle details then press ADD button


Press Yes Button


Press OK Button


Your vehicle in pending status,
waiting for MO to approve.


Once MO has approved
will show “Active”
HOW TO COLLECT PARCEL

Received notification


Open the notification saying that
you have a parcel to be collected

Go to Menu


Go to Parcel

Press the Parcel00284


Show this Parcel QR Code to
Security Guard to collect the Parcel
HOW TO APPLY FACILITY BOOKING

Go to Booking

Press View Button to check the details

Press Booking button

Select the available Date &
Time then Press Save

Press Confirm


Your facility booking is
successfully created
HOW TO APPLY APPLICATION

Go to Booking

Press + Button

Select the object of application

Application rules & regulation

Application in pending, once applicant’s pay for the deposit then only will be approve by MO

Once paid the deposit, MO will approved the application. Applicant’s will receive notification


Application Approved
HOW TO VIEW UNPAID INVOICE

Press Payment button

Select the paid bill to view

Press the Invoice INV-Z-204520 to view

Here is the unpaid INV-Z-204520
HOW TO VIEW PAID INVOICE & RECEIPT

Press Payment button

Press History button to view
the Payment Receipt


Press RECP-100070 in blue link
to view the payment


Here are the Invoice you been
paid. Download and save in
your phone or computer
Send the QR Code via
Whatsapp (example)

Select your friend who will visit

QR Code link is paste to the
Whatsapp and press send

HOW TO MAKE PAYMENT

Press Payment button


Select the Invoice to pay
Press Pay button will connect
to the payment gateway

HOW TO VIEW SOA (STATEMENT OF ACCOUNT)

Press the Payment button

Press SOA Button


Choose the Month of SOA (example September), then Press SET


Press View


Press Download

HOW TO ADD FEEDBACK

Press feedback button

Press “+” button


Fill in your feedback and
upload photo (if any) –
Choose private to send to Admin


Once done Press Save button
HOW TO DO PRE-REGISTER FOR VISITOR
(SINGLE ENTRY)


Press Visitor button

Press “+” button

Insert visitor details (for the time please select the time can reach otherwise this QR code will be invalid due to the time is over)

You can tick √ to set as favourite visitor and press Save button


Press Confirm Button


Press Confirm to share
the QR Code


Send the QR Code via
Whatsapp (example)


Select your friend who will visit

QR Code link is paste to the
Whatsapp and press send
QR Code is sent

Visitor will receive this QR Code. Only can use for 1 time. Do not share to others, once been used cannot be scan anymore and need to create again

HOW TO ADD FAVOURITE LIST FOR VISITOR

Press Visitor Button

Press + Button

Press on the word Visitor Name*

Press + Add button to add for
favourite visitor

Key in visitor details,
then press Save

Press Confirm


Next time can choose from Visitor Name to find the favourite list. This will auto fill up the visitor details. No need to key in every time.
HOW TO FIND FAVOURITE LIST

Press Visitor button

Press + Button

Press on the word Visitor Name *

Press App Favourites
HOW TO SHARE THE EVENT REGISTRATION LINK

Press Event button

Press Share Registration Link

Select the Visitor Type, Key in Name, Contact and Vehicle No. then Press Register


Press OK to confirm the registration


Save or Screenshot this QR image.
To show the Security Guard when Check In
EVENT REGISTRATION CLOSED (exceed the limit of registration)

Visitor need to inform the owner to create a new event

HOW TO ADD NEW EVENT FOR A GROUP OF VISITOR
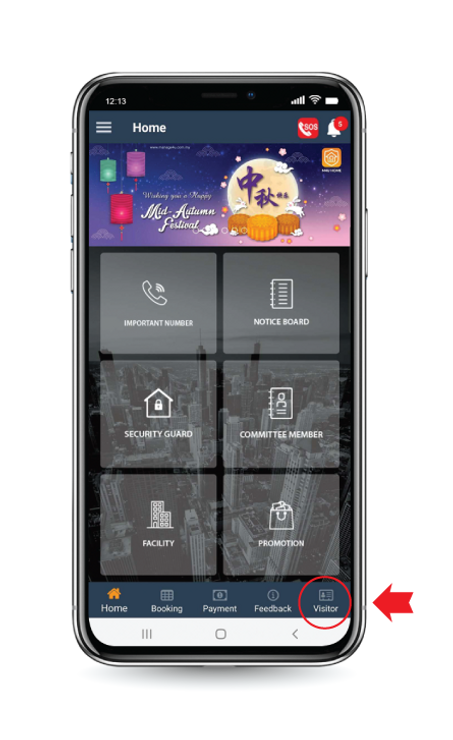
Press Visitor Button

Press event

Press + Button to Add New Event.


Key in the Event Name, Description, select the Date & Time. If you want to set for Limit Registration then need to ✔ and key in Limit Numbers example: 20 (After exceeding this limit this event is closed for register).


Press Confirm button to
Add New Event.

Press Confirm button to
Share Registration Link.


Select the social media that you wish to send the link.


Send the Event Link to the group.
HOW TO ADD SOS LINK (ALERT NEIGHBOUR)

Press Menu

Press SOS Link

Press + button

Select the House Unit, key in mobile number that registered in M4U system.

Press Confirm

Press OK

Waiting your neighbour to accept the request

Once received notification “SOS Alert Now Linked” meaning your Neighbour has accepted.


Click Linked button
HOW TO CANCEL SOS LINK

Press Menu

Press SOS Link

Go to Linked to select the neighbour wish to cancel

Press Cancel SOS Linked

Press OK

HOW NEIGHBOUR TO ACCEPT THE
SOS LINK REQUEST

Press Menu

Press SOS Link

Press the Pending request

Press Accept the SOS Link

Press OK to Update the SOS Link
HOW TO RESET PASSWORD

Press forget password

Key in Email Address and
Username then press CONTINUE

Press Yes to Confirm
Reset Password

Press OK then check your mailbox for a temporary password
